Friday, April 19, 2024

April InstaHop Pajama Crafter Stamps

Happy Friday!
It's time for this month's InstaHop for

See all info below and join us!
**********************************************
Welcome to our April Inspiration Hop at Pajama Crafter Stamps! Our projects reflect our theme, “The Greatest Treasure,” and feature both previously released and two brand new products for a mini release this month! We hope you will join us!
GIVEAWAY:
1. Leave a comment and a like at each hop stop for a chance to win one of TWO $10 store vouchers from Pajama Crafter Stamps! Vouchers must be used by May 31, 2024.
2. Follow me and @pajamacrafterstamps.
3. A winner will be chosen randomly from all comments left by April 24 at 11:59PM EDT. The winner will be announced on the Pajama Crafter Stamps Instagram and Facebook on April 26.
This hop is in no way sponsored, administered, or associated with Instagram or Facebook. By entering, entrants confirm they are 13+ years of age, release Instagram and Facebook of responsibility, and agree to their terms of use.
**********************************************************
The theme for this hop is "The Greatest Treasure"
My project was created with the Prickley Pear
It is a scrapbook page featuring my grandson.
He most definitely is my greatest treasure!

I used the 2 rainbow stamps and 3 of the sentiment stamps on my layout.
I colored the rainbows with Castle Arts Soft Touch Pencils and fussy cut.
The coloring on the sentiments was done with fine line markers.
The patterned papers were printed from a digital paper set.
I added a punched border up top.
The clouds in the background were die cut and inked.
Parts of the quote were printed and parts were die cut.
I added die cut "happy" at the bottom of the photo to complete the
saying on the bib "I make Grandma's heart happy".
I added the stamped and colored sentiments to the yellow border near the bottom.
________________________________________________

Hop order:
@pajamacrafterstamps
@joywilsonink
@joy_in_a_jar
@beckyharrisoncards
@sglass1908
@wendycranford
@lyntomlin
@rickadkinsdesigns
@sejrandersen
@craftyshannonigans
@stamparuecreations
@camiclevenger.artist
@createdjust4udesigns
@monicascrapstreasure
@lisa.newman.560
@743linda
@bdk_creations
@stationarybyjustine

Hope you hop along with us!

______________________________________________________________
Linking up to:
A Place to Start - ATG option
Creatalicious Challenges - ATG w/Something New option (new stamp set)
613 Avenue Create -  ATG or Splash of Color

Monday, April 15, 2024

Blooming Great Day

Hello there!
I hope everyone's Monday is off to a good start!
At least, I think it's Monday?
It gets harder and harder for me to keep track of what day it is!
LOL!

Enough of that.
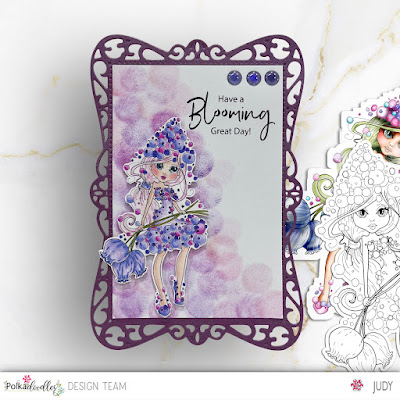
I  have a card created for Polkadoodles to share. 
And since it seems we are having some warmer weather here in Colorado,
it is of a "spring" nature.

I'm using one of the Darling Buds digis.
This collection is one of my favorites from Polkadoodles!
And, it comes as printables or clear stamps!


I colored this beauty with Prismacolor Pencils before fussy cutting.
She is popped with foam tape onto an inked background.
I simply took some coordinating stamp pads and daubed with finger daubers.
 was printed onto the panel before the inking.

My card base was die cut.
I added glitter dots to complete my card design.

Thanks for stopping by and taking a look at my project!
I hope you have a  fabulous week!

***************************************************
Linking up to:
A Place to Start - ATG w/Add One or More Flowers Twist
613 Avenue Create - ATG w/Add Splash of Color Twist
Allsorts Challenge - Spring w/ATG Option

Saturday, April 13, 2024

Birthday Celebration Card

 Happy Saturday!
Today marks the start of a new

The theme is
ANYTHING GOES

This week I created an easel card. 
The card base was die cut and layered.
My focal image is a Lucy Monkman digi, Dog Sitting On Parcels/Gifts.
I colored with Spectrum Noir Market and fussy cut.
I placed a patterned paper strip behind the image from the
Birthday Fun 6x6 Paper Pack.  Enamel dots were added.
The inside of the card has my sentiment which is from
Winnie Celebrations Kit 1 Sentiment Pack. I printed on white card and
layered onto a yellow die cut. The bunting was die cut, colored and
popped with foam tape to act as my stop for the card front flap.


Won't you joining this week?
We'd love to see you there!

*********************************************
Linking up to:
Creative Creases - Anything with a Fun Fold

Thursday, April 11, 2024

Sugar & Spice Album


Hello there! 

I'm  here today with my 2nd project for Clear Scraps as a Creative Guest Team Member.


My project is an album using the Mixable Acrylic and Chipboard Baking Album


This album includes 2 acrylic pages (film must be removed before decorating) 2 heavy chipboard pages and 1 chipboard front embellishment. Pages are approx. 6.5"x8.0" inch. 


I am also using a Mixer Chipboard Embellishment. This album will work great for whatever you may want to keep in it. It could be for recipes, photos or anything else you desire.


Since this is a baking album, I am using Sugar & Spice Clipart & Papers which I downloaded and printed from the Scrapbook Gems Etsy Shop. I love the colors in this collection and thought they would be perfect for this album. Also included in this kit are baking elements which are perfect for embellishing.


I’ll be covering the chipboard and acrylic pieces of the album with patterned paper so, I started by tracing the middle part of the rolling pin twice on the backside of the

paper I chose (1). Next, I cut out both of these pieces and punched holes to align with the chipboard (2).


The chipboard pieces were painted with acrylic paint (3).


I covered both sides of the chipboard and acrylic pieces with 5 x 7 inch pieces of patterned paper (4). The tabs were also covered using pieces measuring 3 1/2 x 1 inch. I used double sided tear tape to adhere. Remember to remove the film from the acrylic pieces before applying anything.


To add little more room to the album I created 2 folder style inserts. 


These were made by taking a piece of 12 x 11 1/2 inch piece of card stock.

Score at 5 3/4 along the 11 1/2 inch side and at 4 inches on the 12 inch side.

Fold and burnish on the the score lines. 

Cut at an angle on either side of the center score line from the bottom up to the 4 inch score line. Fold up and adhere the outside edges.


Punch holes in the folders to align with the other album pieces.


I added patterned paper to the front, back and inside pockets of the folders. A pocket was added to the back of both folders by cutting a rectangle 6 3/8 x 2 7/8 inches. The 2 sides and bottom were adhered with double sided tape.


Now the fun part! Decorating!


I die cut letters to spell recipes, cakes, candy, cookies and pies (1).


Triangles were cut out of card stock to add pockets to the chipboard and acrylic pages. These measure 4 3/4 inches wide and long. I chose to punch a border on the long edge (2). 


Two Z - fold inserts were created to hold additional recipes, photos or whatever else you may want to include in this album. Each one was made by cutting an 8 1/2 x 11 inch piece of card stock in half at 4 1/14 inches along the 8 1/2 inch side. Score both of these pieces at 5 1/2 inches along the 11 inch side. Adhere 2 of the panels together to form 3 panels that fold like a Z. The middle panel can form a pocket by adhering 3 sides, leaving the 4 side open and cut a notch to insert additional items. These Z -fold pieces will fit nicely into the triangular pockets (3).


I added 5 1/4 x 3 3/4 inch pieces of card stock on both sides of 2 of the panels and 1 of the third. Using a corner punch and a border punch I created areas where recipes or photos can secured. (4)


With all of this done, all is left is to embellish each page as desired. I used the elements from the scrapbook kit I used to do so. When this was completed I decided to add some flowers as well. I punched, layered and added pearls to the flower centers.


Ribbon was threaded through the holes in the back of the album up through all the pages and tied in the front.


Here are photos of the complete album.


Thanks so much for taking the time to check out my project!


You can find more Clear Scraps inspiration on the 

Clear Scraps Blog and by following on social media


Clear Scraps Facebook

Clear Scraps Instagram

Clear Scraps Pinterest


**************************************************

Linking up to:

Creative Inspiration Challenges - ATG

A Perfect Time to Craft Open Challenge - ATG

Crafts Galore Encore Challenge - ATG

Classic Design Challenge - ATG

Mini Album Mania - Any type of mini album goes

Wednesday, April 10, 2024

Crafty Gals Corner Challenge

 Happy Wednesday!
It’s time for this month’s challenge at


The theme for our challenge this month is: 

~ Anything Goes ~

 Our wonderful and very generous sponsors for this challenge are: 
(listed in alphabetical order)


Colour of Love
Prize ~ 3 Digital Images


*******
Prize ~ $10 Gift Certificate

A note from Rachelle Anne Miller:
I am an artist & designer living in the beautiful Adelaide Hills in South Australia with my husband and three amazing children! I love to create and am especially drawn to all things cute. I've worked on children's books, greeting cards, craft supplies, children's room decor, tech accessories, and more. I love to bring out joy and imagination in my art and create something a little different to inspire and make you smile.

*********************************************


I colored with Prismacolor Pencils and fussy cut the image. The frame and sentiment were die cut.
I added washi tapes as borders.
Pearls were added to complete my card design.

I hope you join us for this month’s challenge!
___________________________________________

Linking up to:
Addicted to Stamps and More - Die Cuts and/or Stencils
A Place to Start - One of More Flowers
613 Avenue Create - ATG w/Splash of Color twist
Dragonfly Dreams - Use a Die
Creative Knockouts - Birthday Wishes

Sunday, April 7, 2024

Bountiful Balloons

Hey there!
I'm back with a second post today.

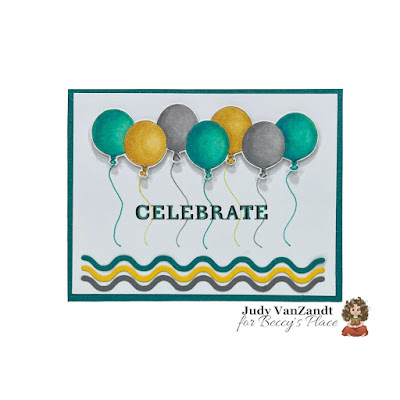
This time I have 2 cards to share created for


 These 2  cards were created with one of this month's new releases,


When you purchase this digital set, you will receive a zip file containing:
- 10 black and white line drawings
- 10 full colour images
- 10 word images / sentiments
I printed the digis on white card stock and colored with Prismacolor Pencils.
They were fussy cut before popping with foam tape onto the card bases.
The sentiments, also from the stamp set, were printed on the white card backgrounds.
I added some die cut borders on the first card and drew the balloon strings with gel pens.
I simply used some card stock scraps to cut strips for 
the second card and added some pearls.


Check this digital stamps set out along with all the other products in store from

And there is always plenty of inspiration and a challenge found at the